Creating Your Website

Oh, what fun it is to create your wedding website!
This is the fun part of wedding planning – no really, it is! Choosing your favorite couple pics, those glamour shots from your professional engagement photo shoot, vacation snaps or sentimental views of you and your one and only – you get to decide what your guests see as they peruse your important wedding info.
This one-stop information spot is loaded with functionality plus cool features to make quick work of creating a website you’ll be ecstatic to show your closest family and friends. Whether you’re a beginner or a techie, here are a few tips so all goes smoothly. Jump in, have fun, and create a wedding website as original as you and your best bud.
Before you start, be sure your account is activated. If you haven’t done that yet, you can get help with doing that here.
Let’s do this step by step so you don’t miss anything! A bit of housekeeping the technology way: The only time your choices are permanently saved is when you click ‘Save Draft‘. The ‘Apply‘ buttons simply hold your choices. Also, save a draft before clicking the full-screen preview circle. This way you will see everything you have ‘Applied‘.

- In the menu list, located on the left side of your screen, click the computer icon with the title, Website.
- First, choose your website URL. You’ll see this area at the top of the page. Pick any name you desire as long as it’s 30 characters or less – no spaces, please – type it in the gray box.
- Then, click the blue button under the box titled Check URL. The built-in URL Checker will let you know if your unique name is available. If not, you’ll be prompted to try again. If your name is available, you’ll get a ‘Success!‘ message.
- Your URL, for example, will look like this: marygreg.digital-rsvp.com This is what you will print on your wedding invites allowing guests to RSVP.
- Note that your website URL will not be proceeded by ‘www.’ No @ either!
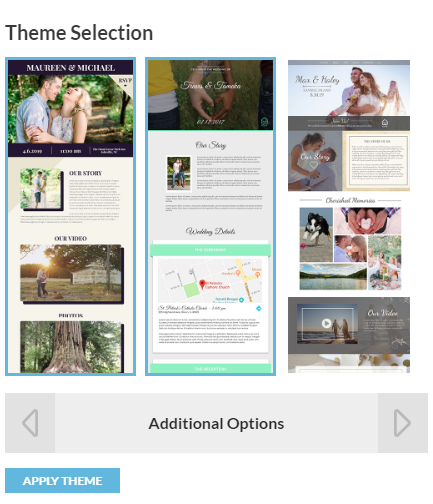
Theme Selection
Themes govern your vibe.
- Take a look at theme option templates. Choose your favorite. When making your selection, a blue frame will appear around that template. Click ‘Apply Theme‘.
- NOTE: As you are creating your website, the template you choose has its own personality and functionality. Not all templates have the same options.
Color Settings
So simple you’ll be tickled pink.
- Next, in ‘Color Settings‘ you literally have every color of the rainbow available for your website. We don’t box you in by limiting color options.
- Take your time, play around with options, or if you already have your wedding color scheme nailed, enter those colors. Then you’re set. There are three areas for color – Main Color, Secondary Color, and Tertiary (which means – you guessed it – third) Color.
- Feel free to use the color slider by clicking on each color field. Or, if you have the Hex color number for your chosen hue, enter it in the box below the color field. Here’s what that looks like:
- After you are happy with your color selections, click the ‘Apply Colors‘ button.

Font Settings
Fonts for all the feels.
- The first drop-down menu displays multiple font options. Choose script, block, fancy or casual fonts to convey your special vibe.
- You’ll choose fonts for section Headings and fonts for Paragraph text. Plus you’ll have the same options as above for color choices of your fonts.
- Have fun mixing and matching your fonts. A word of advice – script or fancy fonts work better for headings and block or type fonts work better for paragraph text for readability.
- Next, choose your font colors – remember to use darker text on lighter background colors and vice versa that way your guests can easily read your beautiful words.
- When you’re happy with your selections don’t forget to click the ‘Apply Fonts‘ button.

Opening Section
This is the first area your guests will see. A picture says a thousand words, but you might want to add some words, too!
- Use your all-time fav photo here. Be sure to use large photos (minimum 2000 pixels) for clearest display.
- Then, choose the color you’d like as the Opening Section font. This will be your names that lay on top of your photo. It looks like this:
- The opening photo is also used as a background when guests are inputting their access code to rsvp. It’s a bit of fanciness we’re known for!
- When you’re ready, click ‘Apply Settings‘.

Our Story
you know – tale as old as time …
- Your guests will love to read your story. Whether your besties who have been there every step of the journey or your distance cousin twice removed, this section will get noticed. Add your second favorite photo and tell your story – the long or short of it.
- Add your own title or use ‘Our Story’ which is provided.
- You have the option to skip this section if you aren’t the oversharing type. Just click the slider to ‘Disabled/Enabled’ – your choice.
- Once complete don’t forget to click ‘Apply Settings‘.

Photo Gallery
Use what you love, have fun with this section.
“The best images are the ones that retain their strength and impact over the years, regardless of the number of times they are viewed.”
– Anne Geddes
Several fun features for your photos here. Choose to Disable/Enable the slider. Once you’ve decided, there are options like:
- Name your gallery or use the provided ‘Photos’.
- Toggle to have your photos ‘Fade‘ or ‘Slide‘.
- Your display can be a ‘Grid‘ or ‘Slideshow‘.
- Click the blue ‘Add Photos’ button when you’re ready to upload.
- Click ‘Apply Settings‘ before moving to the next section.

Video Section
Tell your story with a video
- If you have a video you’d like to use, click to ‘Enable’.
- Add your unique title in the ‘Heading‘ bar.
- See examples on the page for linking your video from YouTube.
- Once your video is loaded, be sure to click ‘Apply Settings‘.

Registry Section
Make gift receiving easy. Our gift registry puts your wishes at your guest’s fingertips. Save yourself time answering the question, “Where are you registered?”
- Enable the registry if you’d like to add your registry locations.
- Give your guests a bit of instruction or simply thank them for considering a gift.
- Choose your style for the layout by toggling the slider.
- You have the option to include color logos of major stores or upload logos of local boutiques if you like.
- Click that dang blue ‘Apply Settings‘ button when you’re ready.

Locations Section
Locations, Locations, Locations!
Your guests need this info! Using the Locations Section of your website will allow for a sleeker look to your wedding invitation. Invites won’t be cluttered with details crowded at the bottom, leaving your design to shine. Or, better yet, you won’t have to pay for an extra card to insert with those pesky details.
- You have the ability to load all of your venue information here. This helps with having all the details in one place where guests will get consistent information regarding lodging, ceremony and reception venues.
- Use the provided ‘Important Addresses’ heading or come up with one of your own.
- Enable the Ceremony block, Reception block and Hotel block or just the ones you need.
- Each block features a Photo option and Detail option. You decide how much information your guests will need.

Social Media
If you have your unique social media hashtag, Facebook page or other social media options, let your guests know they can join in the fun!
- When you ‘Enable/Disable’ the Social media section it will automatically load your hashtag from the Details page, if you’ve filled in that field. It looks like this on the Details page.
- Choose a Heading or leave it blank.
- Add a bit of text explaining your fun hashtag or leave it blank.
- Hit ‘Apply Settings‘ one more time.

RSVP is the reason we exist.
- Upload a fun photo by clicking the blue ‘Upload Photo‘ box.
- Add your unique Heading.
- Add a description and choose a font color.
- ‘Apply’ those settings and you’re done!

Save Your Website is a great way to work on your website a little at a time or finish it in one sitting. You have the option to Save Draft and come back later. When you are ready to let your guests see your website take the leap and click Publish!
The Save Draft and Publish buttons are also located at the top of the Website builder page. You can Preview your website additions and changes as you go. At the top of the website builder on the right side of the screen is a button that looks like this:

Click it and it will show your work in all its glory. Simply close the page to return to the website builder.
Don’t stress. We’re about easy, professional and beautiful websites. If you get stuck, let us know. We’ll happily help with advice or solutions. Contact us at [email protected].