Uploading Your Invites

We make uploading your invite list easy!
You’re in either one of two camps – those who love the detail work of guest info gathering or those who absolutely hate it. But hey, isn’t this the reason you’re having a wedding? Inviting your friends and family to be part of the biggest day of your life? Don’t stress! We’re here to make that job as pain-free as possible.
You have two options when it comes to adding your guest list.
You can add them individually or bulk upload.
Single Upload
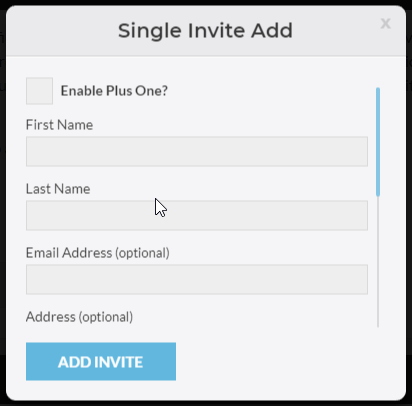
You have the option to enter each address individually. If, for instance, you’re gathering your guest info on scraps of paper, napkins, text messages, Instagram IM, Tweets – you get the picture – and want to add them as they come to you. Just go to the Menu, click the Envelope Icon. The Single Invite Add is at the top right of the Invites page. Fill-in the fields and click Add Invite. For information on designating guests or parties, see below.
Bulk Upload
When bulk uploading USE OUR TEMPLATE ! Our Excel template has all the required fields built right in! Your CSV file must also be set up exactly as our template or the system will reject it! No need to try and reinvent the wheel!
Here’s the steps to make speedy work of your bulk guest list upload.
- When you begin creating your list pay extra attention to the example provided on the first couple of lines on the template.
- Your guest list includes groups and individuals. The spreadsheet is separated into
- ‘Parties’ – which means more than one person on one invitation address. (Think family groups) Ex: Jack and Diane Smith or Joe and Jane Jones and their four kids
- ‘Guests’ – which means one individual is indicated on the invitation address. Ex: Your Aunt Mary – an individual that you don’t know if they will be bringing a guest or you don’t necessarily want to offer that option
- Plus One additions: You get to decide who is offered a Plus One invitation.
- Each invitation has the option to offer a Plus One. You will add this in Column E on the template or check the box on the Single Upload form.
- Each person on your guest list could have a Plus One option – even in a Party grouping
- Here is what the form looks like:

- For a Party invitation: Place the first name of the main recipient in column A and the last name in column B. Ex: Jack (column A) Smith (column B)
- In the next row do that again (this is very important for correct counting of your guests)
- Jack (column A) Smith (column B)
- In the same row add the next person in the party: Diane (column C) Smith (column D)
- For the third and subsequent people in the party:
- Place Jack (column A) Smith (column B) (because he is still the main guest)
- In that row add the third guest. Ex: Suzy (column C) Smith (column D) – this could be Jack and Diane’s child, etc.
- Continue in this fashion until all members of the party are listed with Jack Smith in columns A and B.

- For a single guest listing follow the above process – first name in column A and last name in column B – then in column E indicate ‘NO’ for ‘Enable plus one.’ You’ll just have one row for this guest.

- ‘Guest plus one’ invitations follow the above steps but in the ‘Enable plus one’ column indicate ‘YES.’
- Once all your names and addresses are completed, save your file (it should save as a .csv if you downloaded our template) and then you’re ready to upload the template!
This is the fun part!!!
- On the Digital RSVP site go to Menu, click on the Envelope Icon for Invites (title is Bulk Invite Adds)
- Click the tab under Upload CSV File
- Choose your saved file
- Your file name will appear in the light gray box when it is ready to upload
- On the title bar with Bulk Invite Add click the blue ‘Submit Info’ button and watch as the magic happens!
- Shortly, your guest list will be imported into the system!
- Check your Dash Board and watch your guest number populate – it’s a beautiful thing!
Tips to consider
- Each person needs a unique name. So, if your uncle Joe and cousin Joe have the same exact name, you’ll need to either add Jr to cousin Joe’s name or add a nickname. Otherwise the system will think it’s the same person. Or if the Uncle Joe is in a party, use him as a guest and place Aunt Jane as the main party guest.
- You can add more invites at any time, just use the Single Invite Add tab.
- Addresses are optional, but it’s a nice place to store information on each of your guests for later use.
- If you do not know the kids or other family members names we recommend adding family members using Guest1, Guest2, ect.. for the first name. The last name will be the same as the main invite last name for each guest of the party. This is the best way to make sure the numbers are accurate when adding a larger family when you do not know all the kids names.